Wednesday, 8 September 2010

How do you Save Scene Materials to a .mat file in 3dsMax 2011?

How do you Save Scene Materials to a .mat file in #3dsMax 2011?: http://bit.ly/adWxZC #autodesk #3d #cad #rendering #digarchi #architectureless than a minute ago via web


Link: HERE

Thursday, 2 September 2010

Announcing Google SketchUp 8

Today is an exciting day around the SketchUp World Headquarters out here in Boulder, Colorado. We’ve just kicked off our third bi-annual “3D Basecamp” to a crowd of SketchUp-savvy folks converging on The Dairy Center
from all around the world. I’m looking forward to some great
conversations about SketchUp and 3D modeling in general over the next
few days. But that’s not our only news today...

We’ve also finished work on SketchUp 8,
the next major release of our favorite 3D modeling tool. We’ve been
heads down and working hard for most of the last year, and I’m happy to
be able to share with you the fruits of our labor.


Google SketchUp 8 includes a batch of exciting new features.
We’ve made it easier to build site context models for your projects
using our ever-growing collection of geo-data. We’ve added a new
collection of “Solid” tools for doing common additive/subtractive
modeling operations and we’ve packed out LayOut with some new features
that make it easier to document your models professionally.


Ordinarily,
those of you who use SketchUp in a language other than English have to
wait a few weeks for a version in your language. But not this
time—today, SketchUp 8 is available for download in English, French,
Spanish, Italian or German language versions. (We weren’t able to get
all our translations done in time for release today, but keep an eye on
this blog for news about SketchUp 8 in more languages soon)

As always, SketchUp Pro 8
is available for $495 from our web store. Upgrades from any previous
version of SketchUp Pro can be had from for only $95. And, of course,
we’ve still got a version of SketchUp available for free. Head on over
to our main website for all the details.

You
can be sure we’ll be talking about this release a lot over the next few
days at 3D Basecamp, but I want to make sure that those of you who
weren’t able to join us in Boulder have a chance to let us know what
you think, too. I’ve posted a new Google SketchUp Questions and Ideas series. I’m listening, and I’ll respond to as many of the top posts there as I can.

Via Google

Friday, 27 August 2010

Ecotect Analysis - Comparing Analysis Grid Results

Here is another Tip and Trick for Ecotect Analysis, this time showing how you can compare analysis results by exporting and importing the grid data:

Via Sustainable design toolbox
 

Thursday, 26 August 2010

SU Podium V2 Render Test

If you haven't heard SU podium V2 Public Beta Trial version has been released and is available to download from HERE. This Beta trial version will expire on September 15, 2010 so make sure you try it out before the trial runs out.

I thought i'll give it a go and it seems quite impressive. Below is a quick test render that I did using the new SU podium V2. All I did was chose the "exterior.pps" preset and PNG file output and hit the render button. I Placed the background in photoshop.

podium_v2_test

Click HERE to view a video on SU podium v2 intoduction

Ecotect Analysis - Modelling Shading Effect of Wall Thickness

Tutorial which covers a quick method to model the shading effect of the wall thickness when you have a model created in Ecotect or imported via gbXML:


subscribe to the YouTube channel for more videos :
Sustainable Design Toolbox YouTube Channel

Via Sustainable Design Toolbox

Friday, 20 August 2010

Creating A Final Gather Map and its Benefit: 3dsmax Mental Ray Rendering Tip

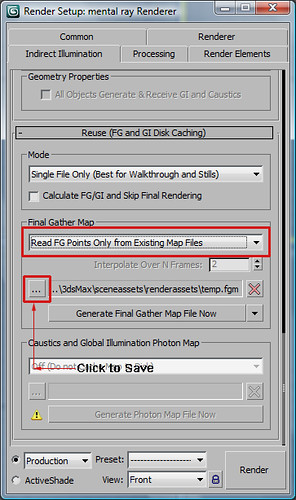
Creating a Final Gather(FG) Map is useful so you can re-use the FG map for a final render. And How to do this? Well Once you are ready to do a proper render after doing a series of test renders Just tweak your FG settings under indirect illumination to what you think is necessary to achieve a good looking render. Set your render resolution to say 640x480. Once you've done that, under indirect illumination scroll down till you find "Reuse (FG and GI disk caching)" . Under that you will see "Final Gather Map" as shown in the image below:

fg1i

In the dialogue box choose "Read FG Points Only from Existing Map Files" and click on the "..." icon to save the FG map in a directory. And then you can just click on "Generate Final Gather Map File Now". Once you have clicked this, it will generate a FG map by rendering it out.

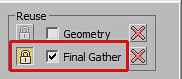
You will see under the rendered frame window, Final Gather will be ticked and locked meaning that it is going to use a FG map to render the next image as shown below:

fg1

Once the FG map is generated, You can then change the resolution of the final render that you want to produce say 1024 x 768 because resolution doesnt matter for FG map. And then change the rest of the settings under the render frame window such as antialiasing as shown in the image below:

fg2

So, when you are creating your FG map you can make the presets lower under the rendered frame window and also render at a smaller resolution but making sure your FG settings are the best. And Once your FG map is created, you can use that same map for the same scene and create a larger resolution render and changing the presets to high quality settings that are under the rendered frame window.

By doing this it saves a lot of time as Final Gather computation can take a long time. So if you render the Final gather at a lower resolution it will be faster than rendering at a lager resolution and their is no need to render with FG at a higher resolution as it doenst really matter if you create a FG map.

Wednesday, 18 August 2010

Interior Scene Render with 3dsmax2011 and Sketchup Model

interior_1

I did a test interior render in 3dsmax 2011 and i think the result is pretty good. The model was downloaded from 3dwarehouse and I just rendered it in max with default textures that came with the sketchup model. As max 2011 can import sketchup files with materials it is really easy now to get photo realistic renders from sketch up models. However, an important feature that is missing is actually be able to manipulate the textures or add some life to the textures for instance, bump maps. The material browser in max does not show the materials in the scene imported through which is a bit of a pain and hopefully this wil be fixed in the next versions of max.

The settings that I used for the render are shown below:

step_1_under_environment_shoirtcutkey_is_8

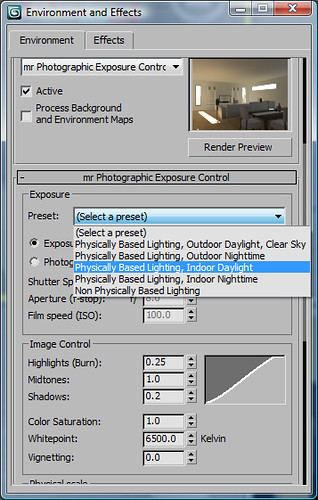
First thing to do once camera is set up is to go to the environments tab and change to "Physically Based Lighting, Indoor Daylight". I also changed the EV value to 7 once I chose the indoor preset and did a render preview.

final_gather_settings

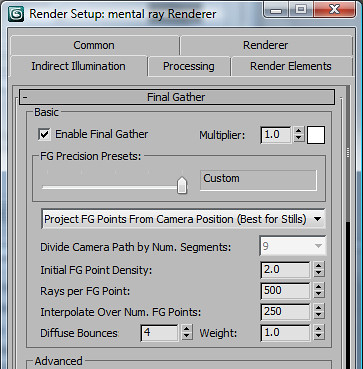
Image above shows the FG settings that I used. I increased the bounce to 4 and increased other settings significantly because the interior scene was coming out too dark and also because the scene does not have any artificial lighting.

other settings_below_render_frame

Lastly, In the render frame window I increased the presets for the final render. Note: Do not tick the Final Gather setting unless you are using a final gather map that you have created in a previous render.

The render took approximately 40mins in my quad core processor. Also, I did a bit of post processing with photoshop after rendering the scene.

Friday, 6 August 2010

SU Podium Version 2 Introduction

Video showing SU podium v2 features:


Plugin is still in beta stage and only version 1 uses can download the version 2.

Saturday, 31 July 2010

Ideate Explorer for Revit tool


The Ideate Explorer for Revit tool gives you an easy, intuitive and profound way to search, quantify and select elements
in a Revit model.

When having the ability to search, filter and tie up inter-relationships between 10,000+ building elements can make or break your workday, you need one simple, powerful Revit add-on to help you explore, quantify and manage your Revit building information model. Ideate Explorer for Revit® from Ideate, Inc. empowers you to do just that.

Click HERE to read More

Free 30 day trial can be downloaded from HERE

Wednesday, 28 July 2010

Great new book: SketchUp 7.1 for Architectural Visualization


SketchUp 7.1 for Architectural Visualization is a treasure trove of information about making your SketchUp models look their best. Robin emphasizes a workflow that uses powerful but affordable tools (like Kerkythea and GIMP) for photo-rendering, but he also talks about creating better animations, using other Google tools for context modeling, adding entourage, matching photos and plenty more. Every time I open the book, I get sucked into reading another incredibly useful tip. It's definitely the most productive time-passer within arm's reach of my computer.

If you're an experienced SketchUp modeler, you owe it to yourself to pick up Robin's book. Your models will thank you.

The above is to the book on Amazon; here it is on the publisher's website.

Via Google Sketchup Blog

Tuesday, 27 July 2010

AutoCAD DWG Rendering Farm with Project Neon

Rendering of interior space of an office building created using Autodesk’s Project Neon.

Autodesk Project Neon rendering of interior space showing lighting effects, created from an AutoCAD file.


Project Neon is a rendering service that offers greater productivity and a faster turnaround of photorealistic renderings by leveraging the power and compute capabilities of the cloud. Rendering is a time and hardware intensive process that translates 3D models into photorealistic images that allow the design team to optimize the results they deliver to their clients. By harnessing the power of the cloud, customers no longer you have to wait for long periods of time to generate single or multiple views of their designs, The Project Neon service eliminates the need for customers to purchase and maintain expensive hardware for their rendering needs. Providing a realistic view into designs during the entire design process delivers superior results for your customers.

It supports autocad dwg files. Hopefuly in the future it supports revit files. Checkout this video on how it works:


Via Autodesk Labs

Revit to 3dsmax using Vray workflow video

This video capture is the third and final video of the three part series covering migrating the Revit models to 3ds Max to develop the renders using V-ray:


check out my previous post for the first two videos.

Click Here for further info on the project.

Create 3D models from photographs using the web

Capturing the reality as-built for various purposes (renovation, energy analysis, add-on design, etc.) is now becoming possible using your standard digital camera thanks to advanced computer vision technologies developed by Autodesk, called Camera Factory, and now made available through Project Photofly.

Project Photofly is a technology preview of automatically converting photographs shot around an object or a scene into "Photo Scenes" using the power of cloud computing. The photographs can be shot with any standard digital camera, as long as you follow some shooting guidelines.

Download HERE

The Photo Scene Editor for Project Photofly is a small application that you download and install on your Windows computer. This application allows you to submit your photographs to the Project Photofly servers and view the Photo Scenes returned by the Project Photofly servers. You can save a Photo Scene in its native format, RZI (Autodesk ImageModeler 2009 format), or export the scene to the DWG file format.

The Photo Scene Editor executable will operate until August 1, 2011.


download and view more videos here:

Youtube Nonyoutube
Autodesk Labs: Convert Photos to 3D Models photo scene editor music lowered volume.mp4
Autodesk Labs: Tutorial 1 on Creating 3D models from Photographs photo scene editor video tutorial 1.mp4
Autodesk Labs: Tutorial 2 on Manually Stitching and Unstitching photographs from a 3D photo scene photo scene editor video tutorial 2.mp4

Via Autodesk Labs


Thursday, 22 July 2010

Photoshop Tutorial: How to add backgound image onto a rendered scene

Below is a quick tutorial I made on how to add background image onto a rendered scene in photoshop. This could be helpful to add context into ur renders and exisiting site conditions.

Basically, when you render your image out from rendering softwares such as 3dsmax or through rendering plugins within sketchup, save your image as .PNG file or .TGA file as it removes the alpha channel automatically.

However, some rendering programs such as Podium is able to save as .PNG file but not able to remove the alpha channel. Well for me it didn't work when I opened up the .png file in photoshop. Therefore, I had to remove the background manually and add a new background image as shown in the video below:


The video can be downloaded here for better quality viewing: http://www.mediafire.com/?ut82560645ea252

Saturday, 17 July 2010

3ds Max 2011 imports .skp files

3DS Max 2011 imports SketchUp (SU) files without needing any plug-ins or Connection Extension add ons.  This is most strategic for Autodesk, and I'm sure that Google is all flustered over this one.

So why is this so special?  Well, typically if you wanted to get your model from SU to 3ds Max, you would then have to have a SU Pro license to export your 3d model into either a .3ds or .obj file from SU.  But now that Max imports the .skp file straight up, this means that Max users can forgo the license for their SU software and use the free version.  Perhaps this will force Google to start charging for even the free version of SU.  But in the meantime, Autodesk has the match point.  So it will be interesting to see what happens in the future!

Via 3dsmax rendering

Revit to 3dsmax using mental ray workflow videos

here are two video presentations that show a revit presentation and the other showing the revit model imported into 3dsmax and rendered using mental ray.


Via nzdan and area

Wednesday, 14 July 2010

New and Updated SketchUp Plugins

A lot of new and updated plugins posted in the past couple of weeks. All of these are from the Sketchucation Forums.

Regular Polygon posted a new Superellipsoid plugin for drawing (you guessed it) superellipses. Also note his Sphere plugin has been updated to version 1.1, and Superellipse to 1.2.

 Thomas Thomassen released 3 new plugins:
  • Groups to Components - bulk conversion of Groups to Components.
  • SuperGlue - Quickly stick GlueTo components back to the faces they lie flush with, or use solvent to release them. Simply click and sweep across the faces and components.
  • Draw BoundingBox - Draws a box from the selected Group/Component. Skewed instances supported. 
 See all of Thom's plugins on sketchucation. He is also working on his first pay plugin for Vertex Editing.

WudWorx has release their 2nd sketchup woodworking plugin for drawing mortise and tenon joinery. Their Dovetail plugin being the first.

sahi has posted a plugin Group in Component to create a single Component from multiple copies of a Group.

FTPlus posted an exporter for T3D format. T3D is a format used by epic's 3d engines. Currently only UEd2(Unreal edit) is supported (UT99 e.g.).

Fredo posted a stand-alone script for making curved ramps called CurviShear. In addition, Fredo's beta plugin Curviloft for lofting and skinning has been updated to version 1.0b.

Didier Bur updated his popular Cloud plugin for importing and exporting point clouds in CSV format. Support has been added for DEM files, setting units, layers, and documentation. Not to mention his Ruby Library Depot has been completely updated.

TIG posted a command-line Camera plugin which includes several commands for setting Axo and Iso views.

c.plassais released a plugin for creating colored edges and dotted lines.

kyyu posted a plugin for creating slots for tabs. kyyu is a regular on the phlatforum where he writes sketchup plugins geared towards using SketchUp for 2.5D & 3D CNC design.

Finally, I posted an index of plugins on the Plugins Forum to help folks find and discover a few of the plugins which have been posted on Sketchucation.

Via sketchup plugins


Friday, 9 July 2010

100 AutoCAD tips you should know


Link

Thursday, 8 July 2010

HDR Processing Video

This is a video showing how hdr processing can be carried out:


For an extensive tutorial on how to create HDR images click HERE.

Thursday, 1 July 2010

Slicer3: Make physical site models fast on Google Skecthup

A good plugin for sketchup to create topography that can possibly be easily exported for laser cutting purposes.


Start with a terrain surface, then make it a solid (I use the Line tool) and group it.

Choosing X for "Slice Orientation" produces slices that are perpendicular to the X axis.

Specify your units in the Spacing and Thickness fields.

Entering the same value for Spacing and Thickness (and choosing Z for Slice Orientation) yields a traditional contour model.


Read More HERE

Slicer3: Make physical site models fast in #google #sketchup: http://bit.ly/aNEyam #architecture #archi #3d #pluginless than a minute ago via web


Essay on Digital Architecture

Below is an essay that I wrote on a topic based on Digital Architecture. The research focused on the question below:

The rhetoric around the digital architecture frames it as the new, as distinct and as a new way of thinking about architecture. It is often framed as being distinct from previous ways of thinking in architecture. Digital is being framed as a paradigm shift. What relationship does digital have with architectures past and its present? And what does it mean that the digital’s aim is for continual instability and change without the mark of the designer? Or is it just another style? Refer to the workings of a contemporary digital architect to support your position.

Digital Architecture Essay


View Fullscreen HERE

Saturday, 26 June 2010

Book Review: Google SketchUp for Site Design


ArchiCAD 14


Wednesday, 9 June 2010

RhinoBIM Structure Available

“RhinoBIM is a suite of a number of planned plug-ins to enhance Rhino 5.0 for the Architectural, Engineering and Construction Industries. Developed by Virtual Build Technologies LLC, the first module now available is called RhinoBIM Structure, for 3D structure modeling, Clash & Clear analysis and structural analysis.

Using Rhino 5.0’s new light extrusion technology, RhinoBIM Structure builds 3D structural design elements that are much lighter in data weight significantly decreasing model size.

With the light database the Clash & Clear analysis finds errors within seconds and there is no need to export the model to another program to perform the analysis.

This work-in-progress version is nearly feature complete and the final version is expected to be released later this year.

RhinoBIM Structure Features:

  • Robust tools for adding and editing structural steel beams
  • Extensive library of steel shapes, including international standards
  • User definable steel shapes
  • Assign materials, attributes, and process treatments to each element
  • Extract data for downstream application, including structural analysis, detailing, cost estimating, scheduling, staging, and fabrication
  • Very fast Clash & Clear analysis
  • Very large model support using new Rhino 5.0 technology
Read More at blgsim

Via blgsim


Friday, 4 June 2010

Plugin: Model Function

A fairly new SketchUp plug-in has become available named the ModelFunction Plugin for SketchUp.

Model Function looks to be a set of parametric tools for defining and editing paths. From the video, it appears you can define paths, and then apply constraints to the path. Then you can associate Components to the nodes on the path.


Via sketchup plugins