Showing posts with label sketchup. Show all posts

Friday, 14 September 2012

Modeling SketchUp roofs on a click with Build Edge PLAN

If you’ve ever taught someone to use SketchUp, you’ve probably drawn the basic SketchUp house and then breezed over the details when it comes to detailing the roof. The truth is that designing roofs is not always a straightforward task, even for experienced modelers.

We’ve explored some solutions for boosting roof design productivity on this blog, and today we’re happy to share a new plugin, Build Edge PLAN, that employs a bit of BIM for quickly creating dynamic walls and roofs. Here’s a quick look at how it works, courtesy of Aaron from Build Edge:


If you couldn’t sit still for the video, here’s the skinny: Build Edge PLAN plugin makes it easier to...

Draw Walls: Rather than outlining walls in a 2D view, and using Push/Pull to extrude them to full height, PLAN can draw complete 3D walls based on your desired dimensions. Each wall can be input as quickly as drawing a single line.

Edit Walls: Even if you are precise when it comes to grouping objects and creating components, modifying walls in an existing structure can be a trying process. With walls created by BuildEdge PLAN, you can move one wall, and all of the attached walls (not to mention the roof) will stretch to stay connected.

Model Roofs: Modeling a pitched roof in 3D is not a straightforward task. Properly projecting surfaces so that they intersect each-other to form a proper roof is time consuming, and if you want to model for framing, including proper heel heights and overhang geometry can be a challenge. BuildEdge PLAN simplifies the process by generating roof geometry from a simple roof outline. Just specify the slope and heel geometry of each side of the roof, and the plugin does the heavy lifting. PLAN also lets you set properties of each roof side individually, so there is plenty of wiggle room for customization.

Roof Creation in Build Edge PLAN: Roofs are created by outlining their profile; selecting individual sections allows for customization

Edit Roofs: Since BuildEdge PLAN recognizes walls and roofs as they are input, you can modify the house as a whole, and move walls or change properties of a roof on the fly. This allows you to quickly change the look of the entire house or any individual properties. For instance, switching from a hip to a gable is literally a single click.

Currently, Build Edge PLAN is only available for PC (a Mac version is in the works). The folks at Build Edge have some quick tutorials to get you going and are pretty great about helping modelers to get the most out of their plugin; give it a try, and the next time you teach someone SketchUp, don’t skimp on the roof.

Via Google SketchUP Blog


Friday, 30 March 2012

Tutorial: How to set up Distributed Rendering in Vray for Sketchup

What is Distributed Rendering (DR) Spawner?

Distributed Rendering is the capability to render a single image across multiple computers. This has the possibility of utilizing multiple computers which can greatly increase rendering speed. VRay can use up to ten computers with just one license.

Tutorial: How to set up the DR Spawner in Vray for Sketchup by Edgar Navas Via Sketchup Vray Resources Blog

Firs of all, you have to connect yours PCs in a LAN (Local Area Network) and know each IP address. By default, Windows OS come with DHCP activated, which is the hub that assigns the IP addresses of each pc.
In my case, for practical reason I made my LAN with static IPs. The default IP address is 192.168.xx.xx. I use another because I manually assign IP address to a specific PC. I use 172.16.25.xx

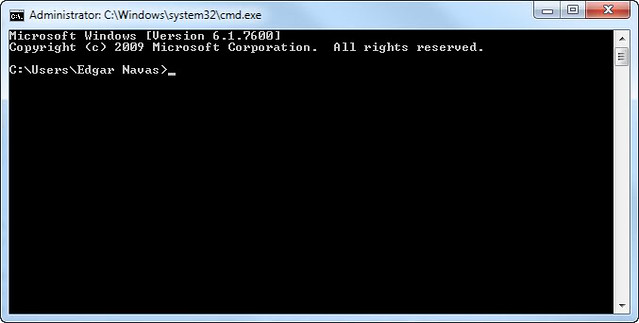
Ok, going back to IPs issue, to know what is the IP address of each PC, in the windows star menu, choose run and then CMD. A window like this should appear.

1

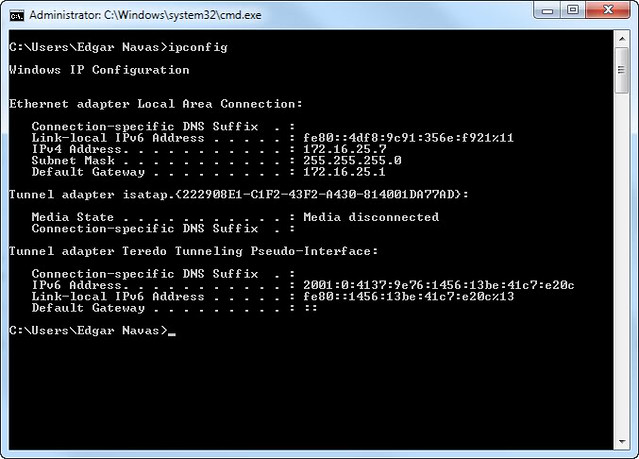
Inside the DOS windows, you have to type ipconfig and then key enter o intro and the screen will look like this.

2


In my case, my IP address is 172.16.25.7 this can be done in each PC that you want to connect whit DR Spawner.

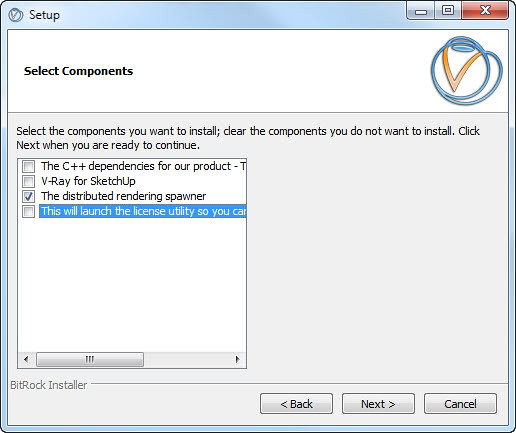
Second an important thing to know, probably you have installed V-ray without Distributed Rendering Spawner, again run the installer an choose only the DR Spawner option.

3

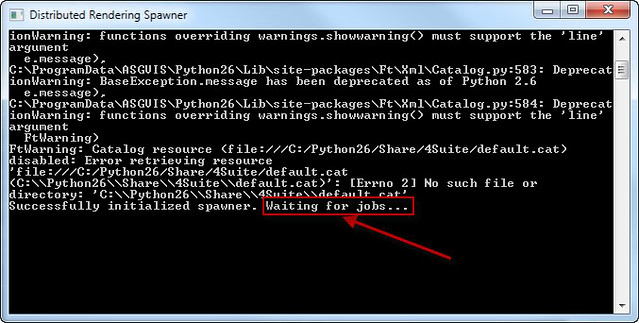
Once the DR Spawner is installed in each PC you have to run, it. It can  be accessed using Windows start->Programs->V-ray for Sketchup->Distributed Rendering Spawner. When you run the DR Spawner a window like this should appear.

4

Don`t close that window.

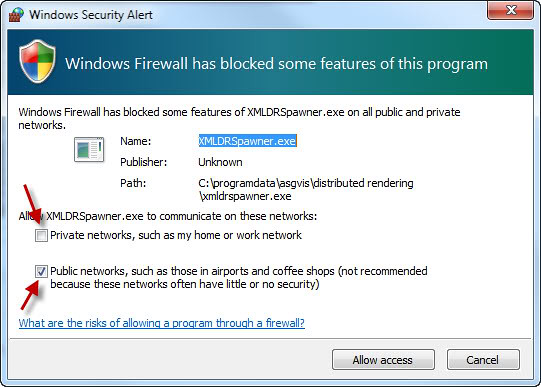
The third important thing to know is the Window Firewall. You  need to set up permissions to the Windows Firewall.


5

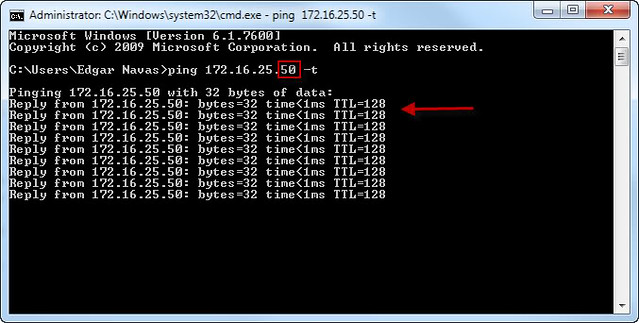
Ok, almost done, to make sure that the Master is connecting to other PCs run CMD again and type (in my LAN is) ping 172.16.25.xx -t where xx is the number or numbers assign to each PCs

6

Now the LAN is ready to make a Distributed render

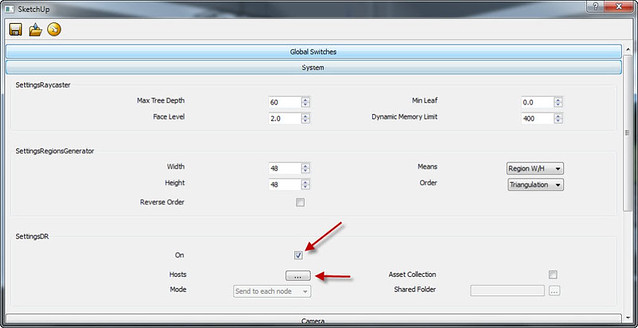
In V-ray Options->System check box ON and then click to the button with 3 points

7

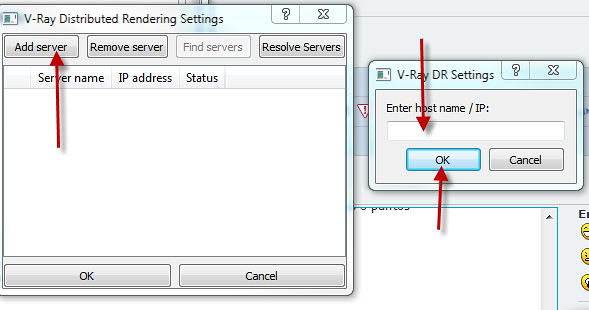
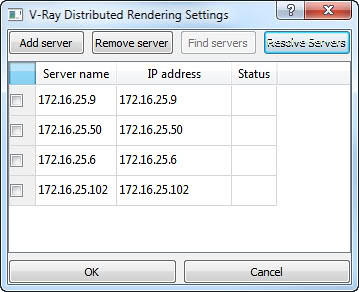
Here is for config the hosts (slaves) add server write the IP address and OK

8

Enter all hosts or servers, click on the button resolve servers and check the IP addresses that we have entered.

9

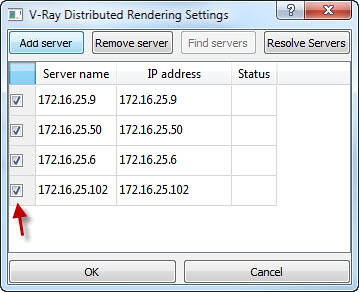
Check the box for each server

9b

And done, Distributed Rendering Spawner it's configured.

Distributed Rendering Spawner Off

9c

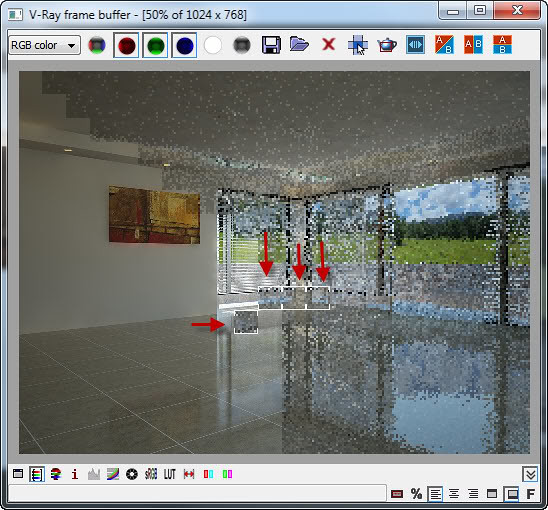
Distributed Rendering Spawner On. Starting

9d

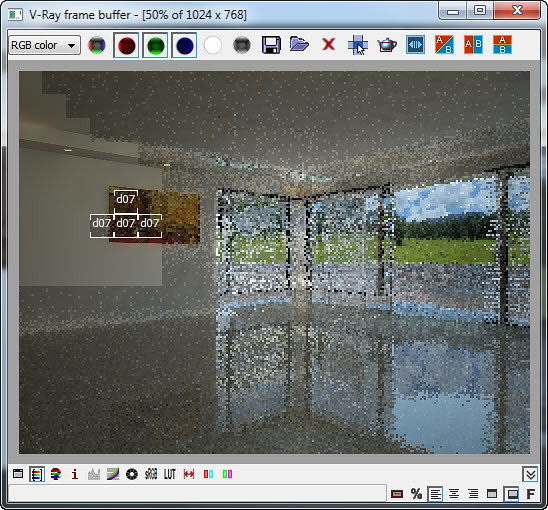
Distributed Rendering Spawner On. Processing.

9e

Distributed Rendering Spawner On. Almost finished

9m


Thursday, 29 March 2012

Product Connect for Google SketchUp

 Product Connect for Google SketchUp helps designers document there product choices made in their SketchUp models. New version of Product Connect is now available for download from the Igloo Studios website.

This video provides a nice overview of the new release:


Via Google Sketchup Blog

Friday, 9 March 2012

Sketchup to Revit with Materials

There have been many posts about how you can control Sketchup materials in Revit using Object Styles. However, this relies on the existence of different layers for each distinct material in the original file. If you have an SKP file and would like to create the layers you need (without using Sketchup itself), you can use this method:
  1. Import Sketchup SKP file in to 3ds Max Design
  2. Export as FBX file
  3. Use Import command in AutoCAD, choose the FBX file - choose to have a layer for each material (Assign Objects to Layers - By Material)
  4. For some reason, I had to untick the Block option - otherwise the file would not import at all.
  5. Save the DWG file
  6. Import to Revit - you now have granular control over each Material / Layer combination through Object Styles...

An alternative way can be found HERE by Revit TotD which may be helpful.

Via What Revit Wants


Saturday, 21 January 2012

New 3D PDF Plugin for SketchUp – LastRay PDF Tools for SketchUp

LastRay PDF Tools for SketchUp allows the user to create 2D or 3D PDF files from the Google SketchUp environment. The plugin comes with a simple PDF designer and a merge tool

Fully functional free trial is available at this link


Friday, 11 November 2011

Tutorials: Maxwell for Google Sketchup

Maxwell Render just recently announced the new renderer for Sketchup which works inside Sketchup and comes with a FREE version which can be downloaded HERE.

Here are series of tutorials showing how to use this renderer for sketchup:


Tutorials are provided by Maxwell Render and You can watch them on there youtube chanel HERE. I Also recommend you download these video tutorials for future references. You can use keepvid to download these videos online.

Wednesday, 9 November 2011

Comparison between four SketchUp renderers

In this blog four popular rendering solution for SketchUp will be compared. You need to download & install SketchUp keeping in mind that renderers are accessible from within SketchUp that needs to include an actual plugin. Here we have picked out four renderers, Indigo Renderer, SU Podium, Maxwell and V-ray.
Google offers most common 3D warehouse model is “A house next to water with a boat”. You need to download the model & these plugin, install it and then start doing test renders of the scene.  It’s a simple test and doesn’t include any depth tweaking of materials.
Indigo Renderer
You have to download two components for it to work- IndigoRenderer standalone software and then SketchUp plugin. Once both are installed, you fire up SketchUp & select render from plugin menu.
You make a render of 1374 X 804 pixels resolution and save the image at any location you desire. To start tweaking the result, you can go into the plugin menu and change the setting. You will also find some built in material editor that allows you to modify the SketchUp material. The time you start tweaking, you can gain much better result and you get advance setting depending upon the version you buy. The full software costs €145 or €595.
SU Podium
The next render we used is SU Podium is very old option available for SketchUp. It’s just one plugin and download is even simpler. Once you install it, you can start SketchUp and render right away.
The result of the product is not very impressive and seems to be less option available although it carry its own material. The full version is available for $198.
Maxwell
Maxwell is very famous and standalone render product and now in the recent version it come with plugin. The installation procedure is worse comparing to two older versions. You need to read the “read me” text file to install it. Once it installed go to Plugin menu and select Maxwell Fire to start rendering.
The result seems fairly good from SU Podium. The price of the product is $95.
V-Ray
V-ray is the professional rendering solution and used by many of the SketchUp user around the world. The manufacturer offer trial version for 30 days. Installation is simple but it will slow down SketchUp’s loading time.
With default setting it yields average quality result. V-ray offer most of the options and material features of the four reviewed products allowing very fine modifications. But the price is very high- $800.       
Via Google

Tuesday, 8 November 2011

How to Render a Section Cut from Sketchup

I've been trying to find a way to render a sectional perspective from Sketchup using Vray for Sketchup rendering engine and finally I have found a way. Here's how to prepare a section cut of your sketchup model for rendering. Unfortunately, this has only worked for me using Google Sketchup 7 rather than the newer version 8. But this may work for you using version 8.

Firstly, Make a backup of your model before you start and save it with a new
name and work on that copy.

Second: Download the two plugins listed below and save the downloaded .rb files in the plugins folder:
C:\Program Files\Google\Google SketchUp 7\Plugins

Zorro 2 plugin HERE (You Can also download this plugin from Sketchucation HERE, however you may need to register first)

Section Cut Face 2 HERE ( You Can also download this plugin from Sketchucation HERE, however you may need to register first)

Restart SketchUp, and, if you haven't already, create your section plane.
Select the section plane, right click on it, and select the option Add Section-
Cut Face. As shown below:


Press OK on the following window. Don't worry about settings, just click OK.


With the section plane still selected, right click on it again and this time select
the option Slice Model at Section.


Delete the section plane, making sure your model has been indeed cut. I
hope you made that backup.


Apply any Color or material you like to the section face group.


And render the result with your favorite render plug-in or export the model to 3dsmax for rendering purposes.


The Tutotial was found in the Sketchucation Forums.
Visit the forum and register to find out more tips and tricks. You can also, download the tutorial as a pdf for your ready reference HERE.
Once Again this tutorial may only work for Sketchup Pro 7.