Friday, 27 August 2010

Ecotect Analysis - Comparing Analysis Grid Results

Here is another Tip and Trick for Ecotect Analysis, this time showing how you can compare analysis results by exporting and importing the grid data:


Via Sustainable design toolbox
 

Thursday, 26 August 2010

SU Podium V2 Render Test

If you haven't heard SU podium V2 Public Beta Trial version has been released and is available to download from HERE. This Beta trial version will expire on September 15, 2010 so make sure you try it out before the trial runs out.

I thought i'll give it a go and it seems quite impressive. Below is a quick test render that I did using the new SU podium V2. All I did was chose the "exterior.pps" preset and PNG file output and hit the render button. I Placed the background in photoshop.

podium_v2_test

Click HERE to view a video on SU podium v2 intoduction

Ecotect Analysis - Modelling Shading Effect of Wall Thickness

Tutorial which covers a quick method to model the shading effect of the wall thickness when you have a model created in Ecotect or imported via gbXML:


subscribe to the YouTube channel for more videos :

Sustainable Design Toolbox YouTube Channel

Via Sustainable Design Toolbox

Friday, 20 August 2010

Creating A Final Gather Map and its Benefit: 3dsmax Mental Ray Rendering Tip

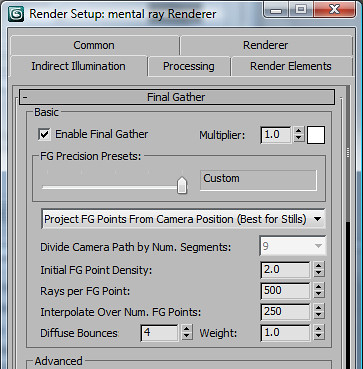
Creating a Final Gather(FG) Map is useful so you can re-use the FG map for a final render. And How to do this? Well Once you are ready to do a proper render after doing a series of test renders Just tweak your FG settings under indirect illumination to what you think is necessary to achieve a good looking render. Set your render resolution to say 640x480. Once you've done that, under indirect illumination scroll down till you find "Reuse (FG and GI disk caching)" . Under that you will see "Final Gather Map" as shown in the image below:

fg1i

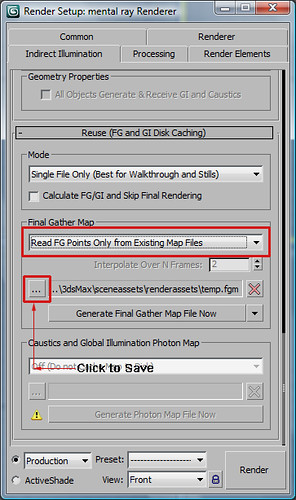
In the dialogue box choose "Read FG Points Only from Existing Map Files" and click on the "..." icon to save the FG map in a directory. And then you can just click on "Generate Final Gather Map File Now". Once you have clicked this, it will generate a FG map by rendering it out.

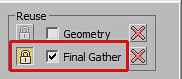
You will see under the rendered frame window, Final Gather will be ticked and locked meaning that it is going to use a FG map to render the next image as shown below:

fg1

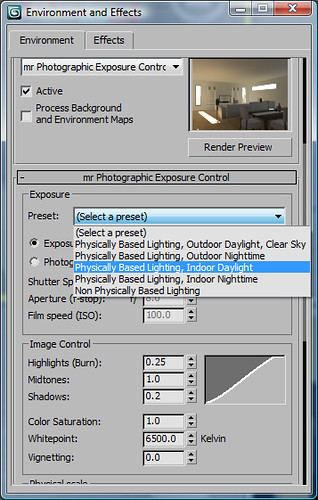
Once the FG map is generated, You can then change the resolution of the final render that you want to produce say 1024 x 768 because resolution doesnt matter for FG map. And then change the rest of the settings under the render frame window such as antialiasing as shown in the image below:

fg2

So, when you are creating your FG map you can make the presets lower under the rendered frame window and also render at a smaller resolution but making sure your FG settings are the best. And Once your FG map is created, you can use that same map for the same scene and create a larger resolution render and changing the presets to high quality settings that are under the rendered frame window.

By doing this it saves a lot of time as Final Gather computation can take a long time. So if you render the Final gather at a lower resolution it will be faster than rendering at a lager resolution and their is no need to render with FG at a higher resolution as it doenst really matter if you create a FG map.

Wednesday, 18 August 2010

Interior Scene Render with 3dsmax2011 and Sketchup Model

interior_1

I did a test interior render in 3dsmax 2011 and i think the result is pretty good. The model was downloaded from 3dwarehouse and I just rendered it in max with default textures that came with the sketchup model. As max 2011 can import sketchup files with materials it is really easy now to get photo realistic renders from sketch up models. However, an important feature that is missing is actually be able to manipulate the textures or add some life to the textures for instance, bump maps. The material browser in max does not show the materials in the scene imported through which is a bit of a pain and hopefully this wil be fixed in the next versions of max.

The settings that I used for the render are shown below:

step_1_under_environment_shoirtcutkey_is_8

First thing to do once camera is set up is to go to the environments tab and change to "Physically Based Lighting, Indoor Daylight". I also changed the EV value to 7 once I chose the indoor preset and did a render preview.

final_gather_settings

Image above shows the FG settings that I used. I increased the bounce to 4 and increased other settings significantly because the interior scene was coming out too dark and also because the scene does not have any artificial lighting.

other settings_below_render_frame

Lastly, In the render frame window I increased the presets for the final render. Note: Do not tick the Final Gather setting unless you are using a final gather map that you have created in a previous render.

The render took approximately 40mins in my quad core processor. Also, I did a bit of post processing with photoshop after rendering the scene.

Friday, 6 August 2010

SU Podium Version 2 Introduction

Video showing SU podium v2 features:


Plugin is still in beta stage and only version 1 uses can download the version 2.