Friday, 21 September 2012

Three Ways to go from Grasshopper to Revit

It seems that more and more people are trying to move intelligent data from Grasshopper to Revit.  There are at least 3 different ways to do this:
Have you tried all three?  Which worked best for you?

You may also be interested in:
Rhino to Revit with Hummingbird | WhiteFeetTools

A recent and very informative post from LMNts describes their experience in moving data from Grasshopper to Revit.  Here is just one paragraph:
Chameleon appeared a few months ago and has proven to be an effective tool for adaptive components. The interface is intuitive on both the GH and Revit sides and we are yet to find any serious bugs with it. Another recent plugin is named Hummingbird (keep track of all these animals), a similar program which accesses the WhiteFeet Modeler to import adaptive components as well as Revit primitives (this has a lot of potential and will be discussed more in a future post). Take your pick, these are both great plugins.

Read more:
Adaptive Components, GH to Revit | LMNts

Note - the awesome glass Revit logo is from here - you can download it and use it as a desktop.  The grasshopper is from here.


Friday, 14 September 2012

Modeling SketchUp roofs on a click with Build Edge PLAN

If you’ve ever taught someone to use SketchUp, you’ve probably drawn the basic SketchUp house and then breezed over the details when it comes to detailing the roof. The truth is that designing roofs is not always a straightforward task, even for experienced modelers.

We’ve explored some solutions for boosting roof design productivity on this blog, and today we’re happy to share a new plugin, Build Edge PLAN, that employs a bit of BIM for quickly creating dynamic walls and roofs. Here’s a quick look at how it works, courtesy of Aaron from Build Edge:


If you couldn’t sit still for the video, here’s the skinny: Build Edge PLAN plugin makes it easier to...

Draw Walls: Rather than outlining walls in a 2D view, and using Push/Pull to extrude them to full height, PLAN can draw complete 3D walls based on your desired dimensions. Each wall can be input as quickly as drawing a single line.

Edit Walls: Even if you are precise when it comes to grouping objects and creating components, modifying walls in an existing structure can be a trying process. With walls created by BuildEdge PLAN, you can move one wall, and all of the attached walls (not to mention the roof) will stretch to stay connected.

Model Roofs: Modeling a pitched roof in 3D is not a straightforward task. Properly projecting surfaces so that they intersect each-other to form a proper roof is time consuming, and if you want to model for framing, including proper heel heights and overhang geometry can be a challenge. BuildEdge PLAN simplifies the process by generating roof geometry from a simple roof outline. Just specify the slope and heel geometry of each side of the roof, and the plugin does the heavy lifting. PLAN also lets you set properties of each roof side individually, so there is plenty of wiggle room for customization.

Roof Creation in Build Edge PLAN: Roofs are created by outlining their profile; selecting individual sections allows for customization

Edit Roofs: Since BuildEdge PLAN recognizes walls and roofs as they are input, you can modify the house as a whole, and move walls or change properties of a roof on the fly. This allows you to quickly change the look of the entire house or any individual properties. For instance, switching from a hip to a gable is literally a single click.

Currently, Build Edge PLAN is only available for PC (a Mac version is in the works). The folks at Build Edge have some quick tutorials to get you going and are pretty great about helping modelers to get the most out of their plugin; give it a try, and the next time you teach someone SketchUp, don’t skimp on the roof.

Via Google SketchUP Blog


Sunday, 9 September 2012

3DS Max Camera Matching Tutorial

This basic level tutorial will introduce you to the early stages of compositing 3D elements into 2D images and videos:


Via Youtube

Thursday, 6 September 2012

Revit LT finally released

image

So today Autodesk finally announced the release of Revit LT. More details can be found here….

http://usa.autodesk.com/revitlt/

Autodesk Revit LT is built on the Revit platform for BIM and allows users to create designs efficiently with 3D, real-world building objects to produce reliable, coordinated documentation faster.  Revit-based applications help deliver better coordination and quality, and can contribute to higher profitability for architects, design professionals and the rest of the building team. Some of the benefits of Revit LT include:

  • Work more efficiently with a single, coordinated model that allows users to concurrently design and document building projects. Autodesk Revit LT automatically manages iterative changes to building models throughout the documentation process. As a result, a consistent representation of the building is maintained, helping to improve drawing coordination and reducing errors.
  • Design and visualize in 3D. Revit LT allows users to see their designs virtually, improving their understanding of the building and its spaces, and helping them communicate design ideas to clients more clearly and effectively.
  • Create photorealistic renderings in the cloud. Users who purchase Autodesk Subscription with Revit LT can render in the cloud directly from the Revit LT interface, enabling them to produce compelling, photorealistic visualizations without tying up their desktop
  • Exchange designs in the DWG or RVT file formats. Produce designs in the DWG file format, and experience fluid file exchange with project team members using other Autodesk Revit software applications.

image

What I think is more important, is to actually understand what you are & what you aren’t getting by purchasing the LT product. This is explained in more detail on the feature comparison page. You should review this carefully.

http://usa.autodesk.com/revitlt/features/

image

Certainly if you are a small firm looking into the delve into the the large pit of BIM, it certainly worth reviewing Revit LT. But you must be aware of some of the limitations of the product, particularly the lack of collaborative working functionality.That’s not to say you cannot link in Revit Structure or MEP files, as you certainly can. If you are a small firm developing Revit content or working on small projects where you don’t need to necessarily collaborate between users working on the same dataset, then Revit LT is a good start point.

Via Revit Blog


Friday, 6 April 2012

Enhanced Interoperability with Revit

With the new 3dsmax 2013 and 3dsmax Design 2013 you can import your Revit files directly into 3dsmax without using the FBX feature. Checkout this video showing the feature and other sneak peak into 3dsmax 2013:


Friday, 30 March 2012

Tutorial: How to set up Distributed Rendering in Vray for Sketchup

What is Distributed Rendering (DR) Spawner?

Distributed Rendering is the capability to render a single image across multiple computers. This has the possibility of utilizing multiple computers which can greatly increase rendering speed. VRay can use up to ten computers with just one license.

Tutorial: How to set up the DR Spawner in Vray for Sketchup by Edgar Navas Via Sketchup Vray Resources Blog

Firs of all, you have to connect yours PCs in a LAN (Local Area Network) and know each IP address. By default, Windows OS come with DHCP activated, which is the hub that assigns the IP addresses of each pc.
In my case, for practical reason I made my LAN with static IPs. The default IP address is 192.168.xx.xx. I use another because I manually assign IP address to a specific PC. I use 172.16.25.xx

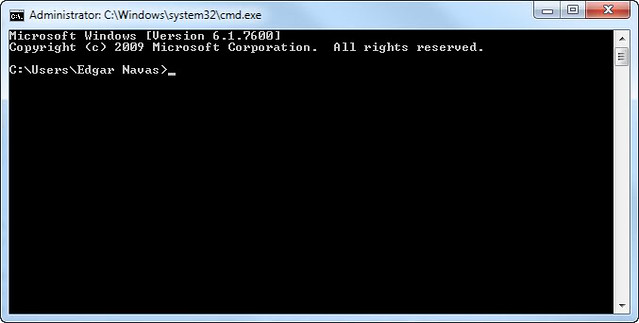
Ok, going back to IPs issue, to know what is the IP address of each PC, in the windows star menu, choose run and then CMD. A window like this should appear.
1

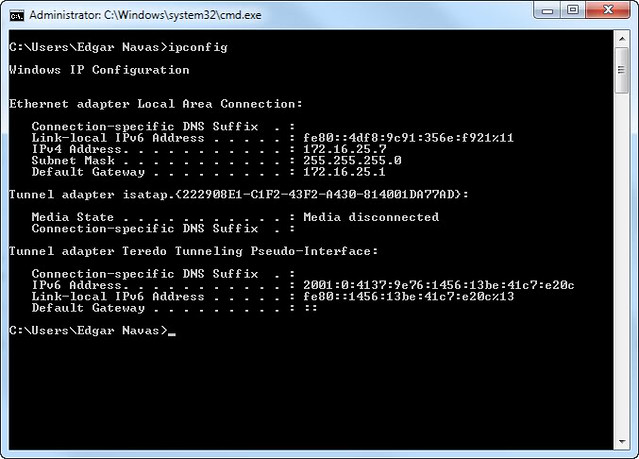
Inside the DOS windows, you have to type ipconfig and then key enter o intro and the screen will look like this.
2


In my case, my IP address is 172.16.25.7 this can be done in each PC that you want to connect whit DR Spawner.

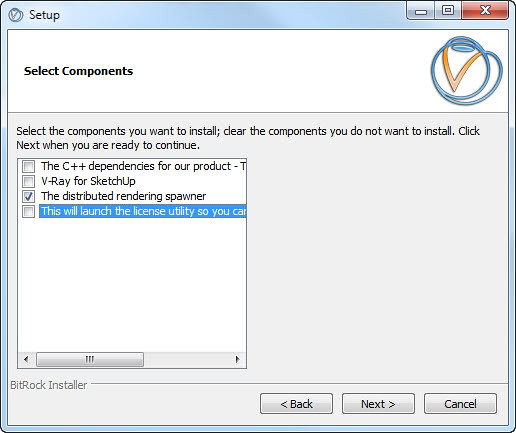
Second an important thing to know, probably you have installed V-ray without Distributed Rendering Spawner, again run the installer an choose only the DR Spawner option.

3

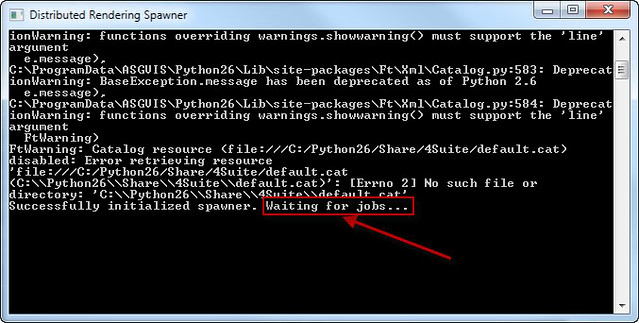
Once the DR Spawner is installed in each PC you have to run, it. It can  be accessed using Windows start->Programs->V-ray for Sketchup->Distributed Rendering Spawner. When you run the DR Spawner a window like this should appear.

4

Don`t close that window.

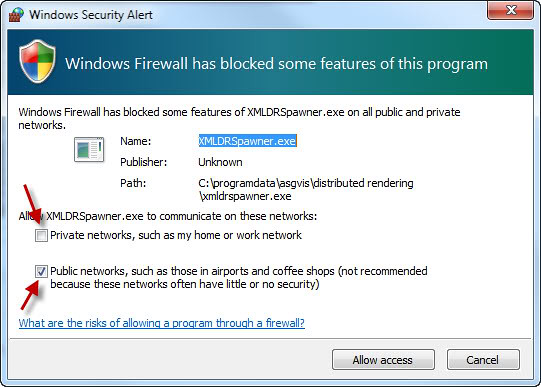
The third important thing to know is the Window Firewall. You  need to set up permissions to the Windows Firewall.

5

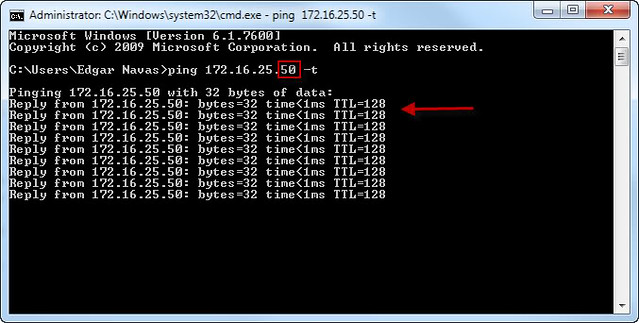
Ok, almost done, to make sure that the Master is connecting to other PCs run CMD again and type (in my LAN is) ping 172.16.25.xx -t where xx is the number or numbers assign to each PCs
6

Now the LAN is ready to make a Distributed render

In V-ray Options->System check box ON and then click to the button with 3 points
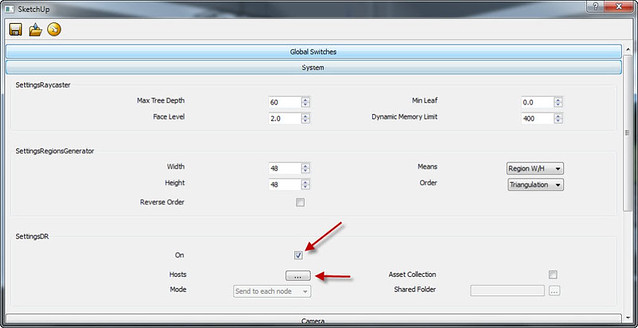
7

Here is for config the hosts (slaves) add server write the IP address and OK
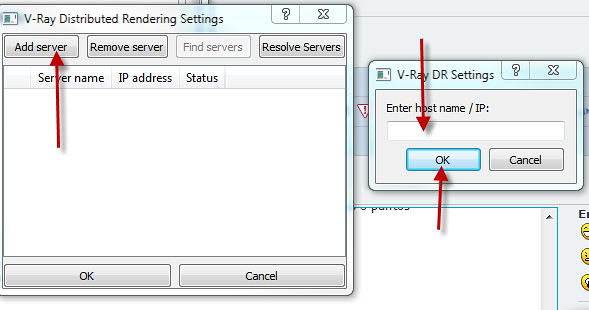
8

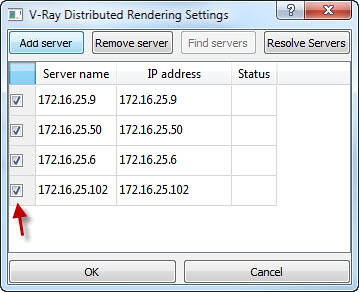
Enter all hosts or servers, click on the button resolve servers and check the IP addresses that we have entered.
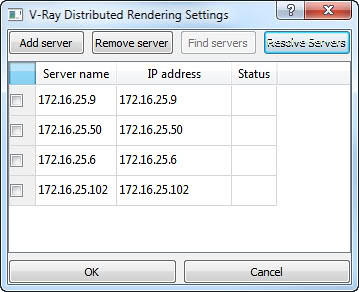
9

Check the box for each server

9b

And done, Distributed Rendering Spawner it's configured.

Distributed Rendering Spawner Off
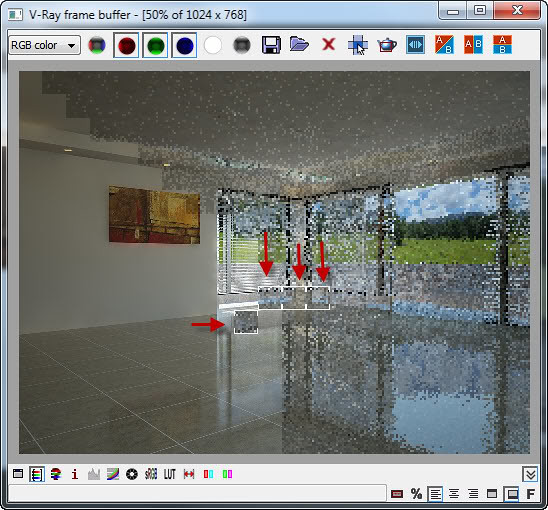
9c

Distributed Rendering Spawner On. Starting
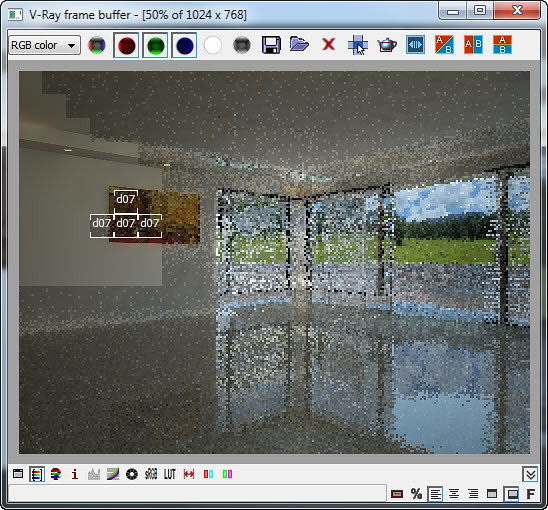
9d

Distributed Rendering Spawner On. Processing.

9e

Distributed Rendering Spawner On. Almost finished
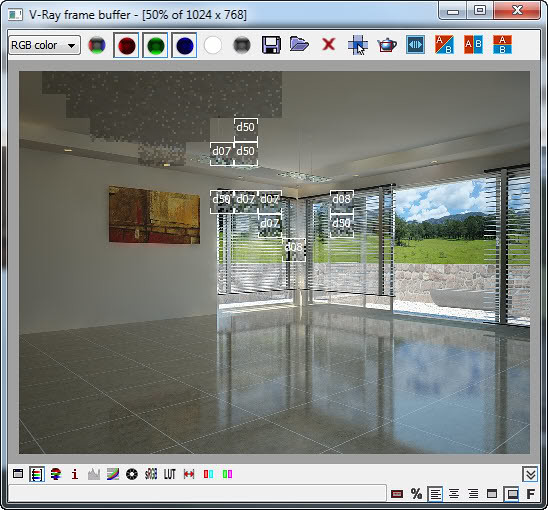
9m


Thursday, 29 March 2012

Product Connect for Google SketchUp

 Product Connect for Google SketchUp helps designers document there product choices made in their SketchUp models. New version of Product Connect is now available for download from the Igloo Studios website.

This video provides a nice overview of the new release:


Via Google Sketchup Blog

Saturday, 24 March 2012

Quick intro to iray in 3ds Max 2012

here’s a quick video: intro to iray in 3ds Max 2012 thanks to Jeff Patton:


iray renderer comes built in within 3dsmax 2012 however,you need a Subscription Advantage Pack for ActiveShade for iray. Via Jeff Patton Blog

Tuesday, 20 March 2012

How to Install Wordpress on your Website

Heres a great video tutorial on the process of installing wordpress on you website:


LINKS:

http://wordpress.org/ - Download Wordpress from here
http://filezilla-project.org/ - A Excellent free FTP Client , FTP Clients are needed to install Wordpress
http://www.000webhost.com/ - Free Web Host, A Web Host is needed to install Wordpress


Monday, 19 March 2012

Training Course: Interior 3D Architectural Visualization in Blender 2.6


Blender Cookie have just announced there new Blender Training Course on Interior 3D Architectural Visualization using Blender 2.6. For those who don't know, Blender is a Free open source 3D animation and rendering software. Details of the training course can be found HERE.


Saturday, 10 March 2012

Vray for Sketchup Resources: Links to Tutorials and Blogs

Tutorials:

Link to: The Complete V-Ray for Sketchup Rendering Process - From Start to Finish HERE

Link to: How to Use Vray for Sketchup to create an Animation HERE and More Video tutorials from Arzi3d HERE

More tutorial videos visit youtube chanel HERE

Online Blogs on Vray for Sketchup:

Sketchup Vray Resources: HERE

Sketchup Vray Materials: HERE

Groups on Facebook:

Join Vray Sketchup Group HERE for further resources and discuss any issues

Join sketchup-vray artists Group HERE for further resources and discuss any issues

Join Sketchup Texture HERE

Friday, 9 March 2012

Sketchup to Revit with Materials

There have been many posts about how you can control Sketchup materials in Revit using Object Styles. However, this relies on the existence of different layers for each distinct material in the original file. If you have an SKP file and would like to create the layers you need (without using Sketchup itself), you can use this method:
  1. Import Sketchup SKP file in to 3ds Max Design
  2. Export as FBX file
  3. Use Import command in AutoCAD, choose the FBX file - choose to have a layer for each material (Assign Objects to Layers - By Material)
  4. For some reason, I had to untick the Block option - otherwise the file would not import at all.
  5. Save the DWG file
  6. Import to Revit - you now have granular control over each Material / Layer combination through Object Styles...

An alternative way can be found HERE by Revit TotD which may be helpful.

Via What Revit Wants


Saturday, 21 January 2012

New 3D PDF Plugin for SketchUp – LastRay PDF Tools for SketchUp

LastRay PDF Tools for SketchUp allows the user to create 2D or 3D PDF files from the Google SketchUp environment. The plugin comes with a simple PDF designer and a merge tool

Fully functional free trial is available at this link